
Selecting an Ultrasonic Spot Welder is not just a matter of choosing the highest wattage. The right machine must match the materials, joint geometry, production rate, and quality checks used on your line. A small change in horn shape can affect energy transfer. So can inconsistent part placement. These details are easy to overlook.
Grand View Research estimated the global ultrasonic welding market at USD 1.6 billion in 2022 and projected a 6.5% compound annual growth rate from 2023 to 2030. That estimate covers ultrasonic welding broadly, not spot welders alone, and should be treated as market context rather than a buying specification. Still, it reflects growing industrial use across applications such as automotive components, electronics, and medical-device manufacturing. For buyers, the practical question is more specific: can the welder produce repeatable joints on your actual parts?
A useful evaluation starts with hands-on trials. Bring representative material samples, including the thinnest sheet and the most challenging joint. Check weld consistency, cycle time, access to the joint, and how clearly the system records process settings. Ask about horn replacement, operator training, and service response—not only the quoted price. A polished demo can hide production problems. It happens. The seven tips below offer a grounded way to compare equipment, question supplier claims, and identify trade-offs before installation. No single specification guarantees a good weld; validation with your own parts remains essential.

Before choosing an ultrasonic spot welder, identify each material and its exact grade when possible. Record thickness, surface finish, coatings, and any fillers or moisture-sensitive additives. Small details matter. Plastics with similar names can respond differently to vibration and heat. Thin metals may also require different tooling and force settings. Confirm that the materials can form a reliable bond, rather than assuming their appearance tells the whole story.
Define the joint before comparing equipment. Note the overlap area, part shape, access for the horn, and the strength the finished joint must withstand. A narrow seam or uneven surface can make energy transfer inconsistent. Specify whether the joint needs to resist pulling, twisting, or repeated vibration. It is easy to overlook these loads during early planning. Test real parts. Samples should match production materials and include normal variations in thickness or surface condition.
Tip: Bring a drawing and representative samples to equipment trials. Ask for results across several welds, not just one successful spot. Check bond strength and visible marks, then adjust joint geometry or settings if needed. A small change in rib height, contact area, or clamping support may improve consistency. Don’t treat the first trial as proof.
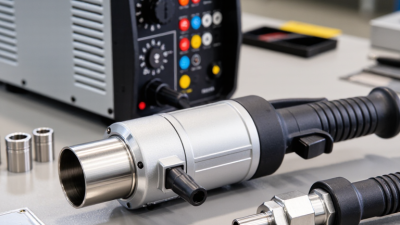
Tip: Start with the joint, not the machine. Match the welder’s frequency, power, and amplitude range to the material and weld area. Thin plastic parts may need less energy than thick or rigid components. A broad tip can spread force, while a narrow tip concentrates it. Small details matter.
Tip: Check force and control settings against your actual assembly. The horn must press parts evenly without crushing ribs, marks, or delicate edges. Look for adjustable weld time, pressure, and energy limits. These controls help operators repeat a stable cycle. Test real parts, not just sample coupons.
Tip: Consider production pace and operator comfort. Compare cycle time with your daily volume, then check how the tool feels during repeated use. A heavier welder may be tiring over a long shift. It is easy to overlook this. Keep a few imperfect samples from trials; they can reveal variation that a single successful weld hides. Before choosing, record the settings and inspect each joint for strength, appearance, and consistency.
Control systems shape how easily an ultrasonic spot welder can be set up and repeated. A basic timer-based controller may suit stable jobs with one material and a fixed part design. A digital system can offer adjustable weld time, energy limits, amplitude, and hold time. These settings help operators tune a process when thin plastic parts deform or a joint needs more consistent bonding. More options are not automatically better.
Check how the machine handles setup and feedback. A clear display should show key settings without making operators dig through menus. Look for alarms, recipe storage, and cycle data if several operators share the welder. These features can help trace changes, though they do not replace routine inspection of horn wear and part fit. Simple matters. A foot pedal may speed loading, while guarded controls and an emergency stop support safer operation. Ask whether the controller can lock approved settings; accidental changes are easy to miss. Not always. During a trial, weld sample parts and record the settings, then check the joint strength and appearance. A neat screen can still hide awkward workflow. Test it on the bench.
| Tip | Selection Criterion | Compare | What to Verify | Why It Matters |
|---|---|---|---|---|
| 1 | Match the welder to the application | Operating frequency, available power range, horn style, and supported materials. | Confirm that the supplier has tested the actual material stack, thickness, joint shape, and access conditions. | Ultrasonic welding is application-dependent; a successful sample weld is more useful than selecting by power rating alone. |
| 2 | Compare control modes | Time, energy, peak-power, and distance or collapse-based control, where available. | Check which modes are supported, whether limits can be set, and whether the controller records the selected endpoint for each cycle. | Different control modes can help manage variation in material, part fit, and joint geometry. |
| 3 | Review cycle adjustability | Weld time, trigger force, down speed, hold time, and amplitude adjustment. | Look for clearly defined settings, repeatable adjustment, and safeguards against unintended parameter changes. | Appropriate adjustments help operators establish a stable process without relying on guesswork. |
| 4 | Check monitoring and alarms | Power or energy monitoring, overload detection, fault codes, and pass/fail limits. | Ask which process values are displayed or stored and whether out-of-range cycles can be identified. | Monitoring helps detect abnormal cycles and supports troubleshooting and process review. |
| 5 | Assess setup and changeover | Recipe storage, password-protected settings, tool-change access, and setup guidance. | Confirm how many recipes can be stored, how settings are backed up, and how repeatable setups are restored. | Convenient, controlled changeovers can reduce setup errors when producing multiple part types. |
| 6 | Evaluate integration options | Foot switch or hand trigger, safety interlocks, remote start, and available I/O or communication interfaces. | Verify interface compatibility with the intended fixture, production line, and safety system before purchase. | Suitable interfaces make it easier to coordinate the welder with the workcell and operator workflow. |
| 7 | Consider ergonomics and service | Control-panel readability, operator access, cooling requirements, consumable tooling, and service support. | Review the maintenance schedule, spare-part availability, training, and access to technical assistance. | A usable, serviceable system can help maintain consistent operation over the equipment’s working life. |
Selection note: Feature availability varies by machine configuration. Validate the proposed settings and weld quality with representative parts before committing to production.
An ultrasonic spot welder is only as repeatable as its tooling. Check that the fixture supports both parts without rocking, and that the horn reaches the weld area squarely. Ask how quickly operators can change tooling and verify alignment after a changeover. Small details matter. A slightly loose nest can shift parts, leaving weak welds that may look acceptable at a glance. Request sample welds using your actual material, thickness, and joint geometry before approving the setup.
Safety checks should cover pinch points, guarding, emergency stops, and exposure to operating noise. The U.S. Bureau of Labor Statistics’ 2023 Survey of Occupational Injuries and Illnesses reported 2.8 recordable cases per 100 full-time workers in manufacturing. That figure is not specific to welding, but it is a useful reminder to assess the whole work cell, not just the machine. Maintenance deserves equal attention: the U.S. Department of Energy’s Operations & Maintenance Best Practices guide cites benchmark estimates of 25–30% lower maintenance costs with predictive maintenance, though results vary by facility. Ask what routine inspections involve, whether spare horns are available, and how wear is recorded. A checklist helps, but it can miss gradual changes in weld quality; periodic pull tests and logged settings give operators evidence to review.
A spot welder’s brochure cannot tell you how it handles your actual parts. Bring production materials, including the thinnest and thickest assemblies, and run repeated welds at realistic cycle times. Record force, amplitude, weld time, energy, and any alarms. Then inspect the joints under magnification and use your normal peel or pull test. Keep samples from each run; small changes in surface finish can alter results. One test is not enough.
Ask the supplier to explain the data, not just demonstrate a clean weld. Can technicians help establish a process window, train operators, and diagnose inconsistent joints remotely? Request written details on calibration, spare-part availability, and service response times. Deloitte and MAPI’s 2024 Smart Manufacturing Survey reported that 92% of manufacturers viewed smart manufacturing as a competitiveness driver over the next three years. That is not proof a welder needs connected features, but it supports asking whether its process data can be captured and reviewed. Verify this during a trial.
Support matters after installation. Ask who handles a failed horn, how replacement parts are identified, and whether troubleshooting instructions include clear photos. Speak with a current user, if possible, and ask about actual response times. I would also revisit my scoring after a few weeks; an impressive demo can hide setup gaps. Real production is less tidy.
Suggested evaluation weights for testing performance and assessing supplier support
Use these suggested weights as a starting point, then adjust them to match your materials, joint requirements, production volume, and service needs. Test sample parts for weld strength and consistency, and verify cycle time under representative conditions. These are planning weights, not measured results or supplier ratings.